Somewhat of a Zombie Pattern
If you wish to create a zombie for yourself, maybe I can help you. I'll post what I basically remember doing.
Body
-I used size 6 dpns
-CO 30 stitches and distribute them
**Make body as tall as you want**
When you are done making the general body, decrease by k2tog every once in a while and then do it more often until you get down to about 9 stitches distributed on the needles.
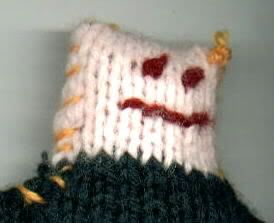
The head is made on the body so you won't have to worry about attaching it.
Increase a couple stitches evenly throughout on the head until you get about 12 or so stitches evenly (I'm really jogging my memory here).
Make the head as big as you want and then decrease either dramatically or gradual, your choice. I think dramatically would be better because gradual would create a cone head.
Cast off.
Arms
CO 15 stitches and distribute them on the needles.
If you are making a *shirt* on your zombie, I think I did about 11 rows in the shirt color and 9 in the zombie skin color. You can vary this. Decrease dramatically or gradual (It doesn't really matter here).
Cast off (Don't forget to make 2 arms!)
Legs
CO 21 stitches and distribute them
Knit about 20 rows or so and then cast off (I didn't decrease)
The ruffle part (created from knitting the legs) at the bottom of my zombie actually let it stand better. So when I stuffed the legs, (as well as everything else, don't forget to stuff it!) I very lightly closed the bottom by creating a little criss cross with the stitches.
( # )
Just attach the legs and arms any way you like, but if you want the zombie to have the "pose" you might want to add a stretched out paper clip in the arms. And don't forget to stitch the face and blood. Perfection is discouraged.
This is really all I remember about making the zombie. This "pattern" is just so you get an idea of what I did--and be creative with it.
Hopefully, this helped. :)
posted by Knitting Nerd @ 8:24 AM
0 comments
![]()


0 Comments:
Post a Comment
<< Home